好项目用到上传+剪裁功能,发上来便于以后使用。我不能告诉你们其实是从博客园扒的前台代码,哈哈。前端是jquery+fineuploader+jquery.Jcrop
以下讨论的是和Asp.net mvc 上传 头像 剪裁相关的Asp.net在mvc环境下实现上传头像加剪裁功能的代码实例 教程文章,内容是本站精心挑选整理的教程,希望对广大的网友给到帮助,下面是详细内容:
正好项目用到上传+剪裁功能,发上来便于以后使用。
我不能告诉你们其实是从博客园扒的前台代码,哈哈。
前端是jquery+fineuploader+jquery.Jcrop
后台是asp.net mvc 4
核心的js调用代码是crop.js和helper文件夹下的ImgHandler.cs
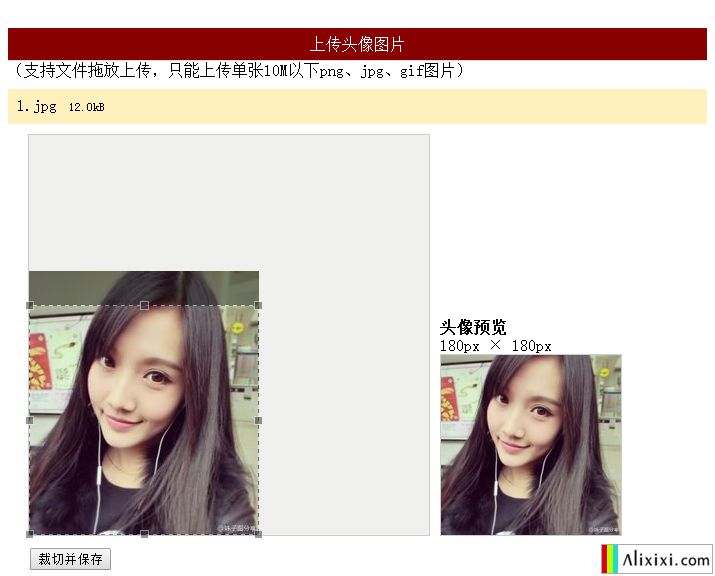
效果图
前台代码
当前头像180px × 180px
后台代码
public ActionResult Index() { return View(); } ////// 保存缩略图 /// /// ///[HttpPost] public ActionResult Index(FormCollection form) { int x = Convert.ToInt32(form["x"]); int y = Convert.ToInt32(form["y"]); int w = Convert.ToInt32(form["w"]); int h = Convert.ToInt32(form["h"]); string imgsrc = form["imgsrc"].Substring(0, form["imgsrc"].LastIndexOf("?")); string path = ImgHandler.CutAvatar(imgsrc, x, y, w, h); //保存Path ViewBag.Path = path; return View(); } /// /// 上传头像 /// /// ///[HttpPost] public ActionResult ProcessUpload(string qqfile) { try { string uploadFolder = "/Upload/original/" + DateTime.Now.ToString("yyyyMM") + "/"; string imgName = DateTime.Now.ToString("ddHHmmssff"); string imgType = qqfile.Substring(qqfile.LastIndexOf(".")); string uploadPath = ""; uploadPath = Server.MapPath(uploadFolder); if (!Directory.Exists(uploadPath)) { Directory.CreateDirectory(uploadPath); } using (var inputStream = Request.InputStream) { using (var flieStream = new FileStream(uploadPath + imgName + imgType, FileMode.Create)) { inputStream.CopyTo(flieStream); } } return Json(new { success = true, message = uploadFolder + imgName + imgType }); } catch (Exception e) { return Json(new { fail = true, message = e.Message }); } }
代码不全,这里是源码:下载地址 ,http://down.alixixi.com/a/2018090669.shtml
关于Asp.net在mvc环境下实现上传头像加剪裁功能的代码实例的内容写到这里就结束啦,您可以收藏本页网址http://www.alixixi.com/biancheng/
a/2018090693729.shtml方便下次再访问哦。