后宫大酒店0.8汉化安卓版
15.23MB · 2025-12-25
Android Activity setContentView流程解析
Activity setContentView流程解析
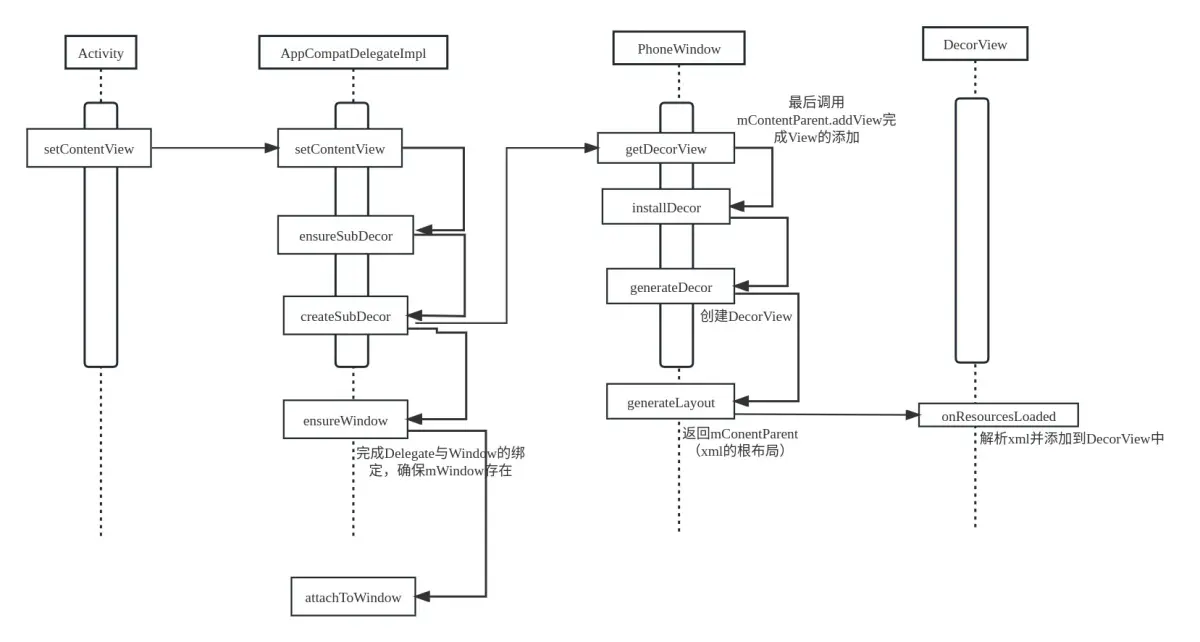
参考图解:

1.当MainActivity直接继承自Activity时
此时会执行Activity类的setContentView方法:
    public void setContentView(@LayoutRes int layoutResID) {
        getWindow().setContentView(layoutResID);
        initWindowDecorActionBar();
    }
主要的逻辑在getWindow().setContentView(layoutResID)中,下面将以实现类PhoneWindow的setContentView方法进行讲解 在该方法的开头,首先会对mContentParent进行判空检查,为空时将调用installDecor()进行DecorView的初始化:
    if (mContentParent == null) {
        installDecor();
    }
进入installDecor方法,首先当decorView为空时,会调用generateDecor方法进行DecorView的创建:
    if (mDecor == null) {
        //核心方法
        mDecor = generateDecor(-1);
        //......
    } else {
        mDecor.setWindow(this);
    }
进入generateDecor方法,该方法比较简短,在完成context的创建后就创建出一个DecorView并返回:
    protected DecorView generateDecor(int featureId) {
        Context context;
        //根据不同情况对context进行初始化
        //......
        return new DecorView(context, featureId, this, getAttributes());
    }
至此完成了对mDecor变量的赋值。 回到installDecor方法,此时将进入contentParent的创建逻辑,核心方法是generateLayout,该方法将对mContentParent进行赋值(这个contentParent就将作为MainActivity布局的父容器):
    if (mContentParent == null) {
        //核心方法
        mContentParent = generateLayout(mDecor);
        final DecorContentParent decorContentParent = (DecorContentParent) mDecor.findViewById(
                R.id.decor_content_parent);
        if (decorContentParent != null) {
            mDecorContentParent = decorContentParent;
            //......
        }
        //......
    }
进入generateLayout方法,
    protected ViewGroup generateLayout(DecorView decor) {
        //......
        //上面省略的代码根据Flags、Feature等数据完成了对layoutResource的赋值
        mDecor.startChanging();
        mDecor.onResourcesLoaded(mLayoutInflater, layoutResource);
        //ID_ANDROID_CONTENT值为com.android.internal.R.id.content
        ViewGroup contentParent = (ViewGroup)findViewById(ID_ANDROID_CONTENT);
        //......
        mDecor.finishChanging();
        return contentParent;
    }
进入onResourcesLoaded方法,此方法主要的工作就是将layoutResource对应的xml文件解析并添加到decorView中:
    void onResourcesLoaded(LayoutInflater inflater, int layoutResource) {
        //......
        mDecorCaptionView = createDecorCaptionView(inflater);
        final View root = inflater.inflate(layoutResource, null);
        if (mDecorCaptionView != null) {
            if (mDecorCaptionView.getParent() == null) {
                addView(mDecorCaptionView,
                        new ViewGroup.LayoutParams(MATCH_PARENT, MATCH_PARENT));
            }
            mDecorCaptionView.addView(root,
                    new ViewGroup.MarginLayoutParams(MATCH_PARENT, MATCH_PARENT));
        } else {
            addView(root, 0, new ViewGroup.LayoutParams(MATCH_PARENT, MATCH_PARENT));
        }
        mContentRoot = (ViewGroup) root;
        initializeElevation();
    }
此时完成了对decorView的xml布局文件的加载。 回到generateLayout方法,此时将通过findViewById获取到com.android.internal.R.id.content这个ViewGroup,上述decorView加载的xml文件里就有一个控件id与之对应,这个控件就是我们加载并添加MainActivity的布局文件的地方。 generateLayout方法完成了对mContentParent的赋值,也就是说,DecorView中放置MainActivity内容的父容器已经准备完毕。 至此,installDecor方法的核心逻辑介绍完毕,接下来将MainActivity的布局文件加载到decorView的content中,即结束了整个加载流程:
    public void setContentView(int layoutResID) {
        //......
        mLayoutInflater.inflate(layoutResID, mContentParent);
        //......
    }
2.当MainActivity直接继承自AppCompatActivity时
首先,进入AppCompatActivity的setContentView方法:
    public void setContentView(@LayoutRes int layoutResID) {
        getDelegate().setContentView(layoutResID);
    }
此处的getDelegate方法会创建一个AppCompatDelegate对象,由AppCompatDelegateImpl类实现, 进入AppCompatDelegateImpl的setContentView方法:
    public void setContentView(int resId) {
        ensureSubDecor();
        //......
    }
首先,进入ensureSubDecor方法:
    private void ensureSubDecor() {
        if (!mSubDecorInstalled) {
            //核心方法
            mSubDecor = createSubDecor();
           //......
        }
    }
进入createSubDecor方法:
    private ViewGroup createSubDecor() {
        //ensureWindow方法完成Delegate与Window的绑定,确保mWindow存在
        ensureWindow();
        mWindow.getDecorView();
        //......
    }
首先,进入PhoneWindow的getDecorView方法:
    public final @NonNull View getDecorView() {
        if (mDecor == null || mForceDecorInstall) {
            installDecor();
        }
        return mDecor;
    }
可以看到,此处也会与第一种情况一样调到installDecor方法,该方法会将到PhoneWindow内部的DecorView的xml文件的加载解析为止的操作全部完成 回到createSubDecor方法:
    private ViewGroup createSubDecor() {
        //......
        final LayoutInflater inflater = LayoutInflater.from(mContext);
        ViewGroup subDecor = null;
        //......
        //完成subDecor的布局解析与加载
        final ContentFrameLayout contentView = (ContentFrameLayout) subDecor.findViewById(
                R.id.action_bar_activity_content);
        final ViewGroup windowContentView = (ViewGroup) mWindow.findViewById(android.R.id.content);
        if (windowContentView != null) {
            while (windowContentView.getChildCount() > 0) {
                final View child = windowContentView.getChildAt(0);
                windowContentView.removeViewAt(0);
                contentView.addView(child);
            }
            windowContentView.setId(View.NO_ID);
            contentView.setId(android.R.id.content);
        }
        mWindow.setContentView(subDecor);
        return subDecor;
    }
windowContentView为android.R.id.content对应的View,contentView为R.id.action_bar_activity_content对应的View,与第一种情况不同的是:它会先将android.R.id.content的子View全部迁移到R.id.action_bar_activity_content上,之后将R.id.action_bar_activity_content对应的View的id替换为android.R.id.content,之后将subDecor添加到PhoneWindow上,进入PhoneWindow的getDecorView方法(此处直接列出了最终会执行到的方法):
    public void setContentView(View view, ViewGroup.LayoutParams params) {
        if (mContentParent == null) {
            installDecor();
        }
        //......
        mContentParent.addView(view, params);
        //......
    }
由于之前已经完成了mContentParent的创建,所以不会再执行installDecor,将直接进行addView。 至此,将decorView添加到了PhoneWindow上,回到最初的AppCompatDelegateImpl的setContentView方法完成对MainActivity xml布局文件的加载:
    public void setContentView(int resId) {
        ViewGroup contentParent = mSubDecor.findViewById(android.R.id.content);
        contentParent.removeAllViews();
        LayoutInflater.from(mContext).inflate(resId, contentParent);
        //......
    }
3.流程总结
1.Activity核心就是PhoneWindow的setContentView方法,其主要干了两件事: 1.完成DecorView的创建与加载 2.将MainActivity的布局加载到DecorView内的一个ViewGroup中
创建DecorView,即installDecor方法,其内部用到了两个核心的方法: 1.generateDecor方法创建出DecorView对象 2.generateLayout方法完成这个DecorView对象的布局加载,并完成了MainActivity的父容器的赋值(即contentParent变量)
2.AppCompatActivity 核心就是AppCompatDelegateImpl的setContentView方法,它主要干了两件事: 1.准备好subDecor 2.将MainActivity的布局加载到subDecor内的一个ViewGroup中
准备subDecor,即ensureSubDecor方法,用于确保subDecor已经完成创建,内部的核心逻辑在createSubDecor方法中
createSubDecor主要干了几件事: 1.确保Delegate获取到了MainActivity的PhoneWindow实例(ensureWindow方法) 2.完成PhoneWindow内部的DecorView的创建与准备(也就是第一种情况的installDecor方法) 3.创建subDecorView,并让subDecor接管R.id.content(原先属于PhoneWindow内部的DecorView) 4.清空PhoneWindow内部的DecorView的内容,并将subDecor添加到该DecorView中 5.把MaiActivity的布局加载到subDecor中(即R.id.content)
4.差异梳理
第一种情况直接走了Activity的setContentView方法,加载用户布局也是直接用的Activity的PhoneWindow里的DecorView 第二种情况走了AppCompatDelegateImpl的setContentView方法,其PhoneWindow是从MainActivity获取的。使用了一个中介的subDecorView,PhoneWindow自身也有一个DecorView,并且完成了至DecorView的xml文件加载为止的所有操作,之后,subDecorView将被添加到该DecorView中,而原先往R.id.content的布局内容添加将全部由subDecorView进行接管,至此,方完成第二种情况正式加载MainActivity资源操作前的全部工作,而第一种情况则在PhoneWindow的DecorView xml文件加载工作完成时就已告结束。 综上所述,两者最显著的区别就是第二种情况多了一层subDecorView的添加与替换接管的操作。
15.23MB · 2025-12-25
248.99MB · 2025-12-25
1.25 GB · 2025-12-25


